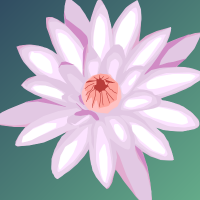
This tutorial is designed to help you get an idea how to vector. For this tutorial, the photo to the bottom of this article will be the one that will be referenced throughout the tutorial. The same techniques can be used for other pictures and even freehand vector images. Although I am going to be using Paint Shop Pro, these same things can be done in Photoshop and Illustrator. Also, because some of the images are quite large, they will be resized, so you will have to right click and open in a new window or tab to see the larger version. Some images may only be opened in a new window to view.
1. Choose an image. As said, for this tutorial, you can download the image HERE. You will have to right click and open it in a new window before saving it to your own computer.
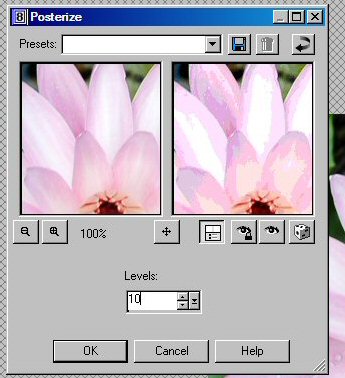
2.  Posterize the image. This will help you be able to differentiate which layer is which. In this case, for Paint Shop Pro, go to Edit> Artistic Effects> Posterize. For the best layer separation in this particular photo of a lily, use 10.
3. For this image, you can either use your own colors or the ones in your image. For this tutorial I am using ones closest to what the image has already. To get the colors for your first layer, choose the dropper tool  and click in the color that you will start with. My suggestion is to pick a starting place that will be best, like a base color. When I create vectors, I start with a base and then continue with my lighter colors before going back for the darker shades. It makes less work as some vectors are difficult and require that you move some layers around.
 4. You will need to zoom in on the image to help you focus on outlining. Use the
  pen tool and with your first color, outline the flower. Using 1.0 width. You do not want it to be a wide line.
5. Once done with the first layer, put that on invisible in your layer toggle area. With the next layer, you will outline the next lighter color from your base color. Make sure to click on New Drawing Object to start your next layer.
6. ( Second Layer Screenshot |First 2 Layers | Three Layers | Almost done)Repeat each layer until you get to the lightest layer. You may improvise with more layers if you like a smoother vector. When the light layers are done, touch up with the dark layers.
7. Once all layers are completed, toggle all layers to be visible to check work. Make appropriate changes until satisfied. Delete the background rastor image to leave background transparent. You can make your own background if you want.
 8. Save in raw form so you can make later alterations if needed. To save for use, merge only the layers visible. Do not merge all or you will have a white background.


nice tutorial. that's what i need to design my logo.
My recent post How Often Should I Post on My Blog
I've always wanted to design vector images for my blogs. But always thought it was a difficult task. Your blog post show you how to do it easily. Thanks for sharing this info!
My recent post Weider Home Gyms – Very Popular Exercise Machines For Home Gym Users
That's so nice and well explicated. Thank you for sharing.
It’s awesome….easy to follow. I will try to make my logo with your tutorial. Thank you for sharing.
Thanks for such detailed explanations! You made it seems so easy!
I really like what you guys are usually up too. This kind of clever work and exposure! Keep up the very good works guys I’ve you guys to our blogroll.
I’ve started learning AI couple of months ago and love it. I am always looking for tutorials I can improve on my skills. The author used Paint Shop Pro, but I am sure I can figure it using Ai as well. Thanks.