 The great thing about WordPress is that you can do a lot of things, including the fact that you can add images in most places.
However, after encountering a few clients who were still learning how to use WordPress the question on how to add images to widgets keep popping up. So, I am going to show you a couple methods. One of these may be easier that the other.
The first method is using WordPress to you advantage. The second method is a crash course in basic HTML.
Add Images to Widgets in WordPress – Using The Add Media
1. Create a new post or page.
2. Click the Add Media button.

3. Upload the image you want to use, or if you have already uploaded the image, select it.
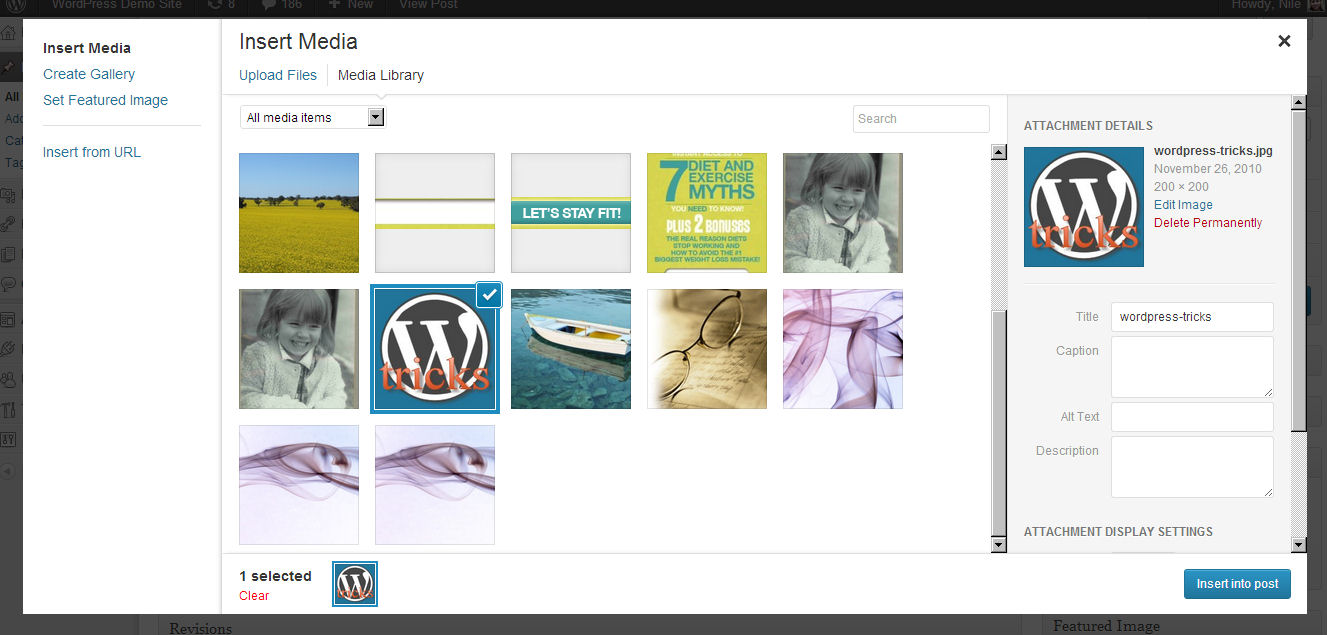
4. Label your image.
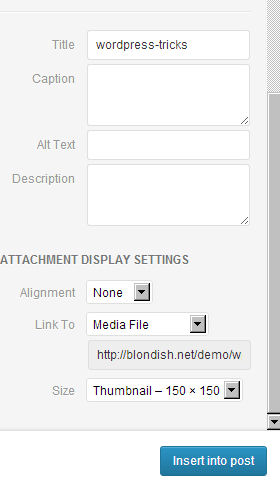
5. Click the button to insert the image into the new post or page.
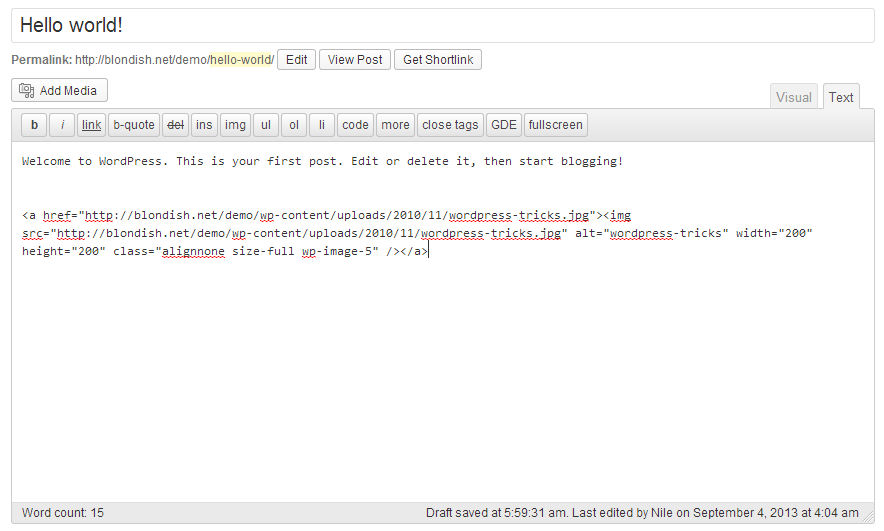
6. Copy the code inserted into your post. (You will want to have the post editor in the HTML mode tab.) The code will look similar to the following:
<img src="YOURIMAGE" alt="IMAGENAME" width="200" height="200" class="alignnone size-full wp-image-5" />
You might want to edit that code down to:
<img src="YOURIMAGE" alt="IMAGENAME" />
7. Go to Appearance> Widgets
8. Drag a Text Widget to the widget area you want your image to go.
9. Paste your HTML into the widget.
<img src=”https://nileflores.com/wp-content/uploads/2013/09/add-image-wp-5-252×300.jpg” alt=”add-image-wp-5″ width=”252″ height=”300″ class=”aligncenter size-medium wp-image-7280″ />
10. Click the button to save your widget.
Add Images to Widgets in WordPress – Using HTML
In HTML, the basic markup for an image is:
<img src="LINKTOYOURIMAGE" alt="NAMEOFIMAGE" />
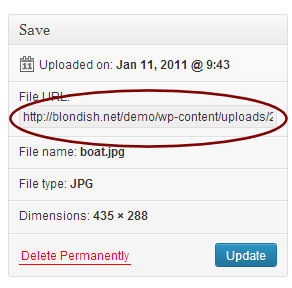
You will replace LINKTOYOURIMAGE with the URL to the image that you want to use. This could either be from an external source or from your own WordPress Media Library. You will need to get the image’s link by going to your Media Library and clicking Edit on the image. You will then copy the File URL that is in the box to the right of the image.
You will also need to change NAMEOFIMAGE to the name of your image. This is there as a means to label your image. It is consider part of valid markup and beneficial for search engine optimization.
The following HTML includes linking to another website or URL:
<a href="LINKTOWEBSITE"><img src="LINKTOYOURIMAGE" alt="NAMEOFIMAGE" /></a>
The following HTML includes linking to another website or URL and making that link open in a new window.
<a href="LINKTOWEBSITE" target="_blank"><img src="LINKTOYOURIMAGE" alt="NAMEOFIMAGE" /></a>
With any of the code, you just go to Appearances > Widgets in your WordPress backend. Then you drag over a text widget and past your code. If you need to position the image better, you might have to add some styling.
For example:
<img src="LINKTOYOURIMAGE" alt="NAMEOFIMAGE" style="width: 200px; margin: 0px 5px 0px 0px;" />
Personally, I like the second, rather than using the first method.
How do you add images to widgets in WordPress?
I used to use the 2nd method you outlined above, then I found the “Image” widget and now I just use that. Just drag the widget to the sidebar, open click on select image and pick out whatever you want to add from the media files – there’s an option to add a link, which I almost always do – and that’s it. I love easy. 🙂
i tried it so many times but i always fail to add code but this time i am completely done with this thnx for the code and nice tutorial
Hey Nile ..
Thanks for it! I want to know one thing is more that if i want to add any page link my pic in widget that what should I do ? I tried a lot to put link on wedget’s image! If it is possible to do then inform me. I would like to do it.
Nile,
I long time ago I did a video tutorial on how to add an image to a text widget. Your instructions are very clear and helpful. However, these days I just install the Black Studio Widget plugin and then click on the “add media” button (or whatever it is) using the visual editor in the Black Studio Widget.
I thinks it’s really important that people know how to use the methods you taught here to help them master the basics!
Thanks again for more great stuff!
Love Your Blog and Hope You win the Small Business Influencer Award! I have voted for you more than once!
~ Jupiter Jim
Hii Nile
This post really helps as I was searching for this post from 2 days
A special Thanks for sharing this post
Nice tutorial, I found it useful because Tomorrow I am going to use the method. Thanks
Quick tutorial for the quick purpose. I have been using this trick from last several years, and it allowed me embedding lot of stuff in my WordPress website. The TEXT format widget is just a blessing.
Nice tutorial Nile i never tried this in my short blogging career but now i am going to give it a shot. your article is very clear and step by step good job thanks for sharing it with us…
Hello Nile,
Your blog’s design is really nice. I have visited your blog many times and learnt lots of things. But now i am placing a comment here. I faced problem adding images in my blogspot blog side bar with anchor text and return to your blog and found this helpful for me.
So many thanks Neil for your great post.
Regards,
Gautam
Hi Nile,
Thank you for the information. For me it is very useful, especially when you want to add an image to an opt in form (usually above the opt in form). I use the second method but now I think the first one is simpler.
Everything you wrote was carefully copied and placed in my swype file for later use. I will surely forgot it in a week but now I know I have a clear guide for adding images to widgets and whenever I need, I can go to that file and learn how to do it again.
Now, there is another thing that interests me very much. Maybe your clients talked to you about that. When I insert a video in my blog, I use Youtube. I upload the video to youtube and then insert the code into my post and it works. You can do the same with other video sites.
The problem is that you are dependent to an external source. This is what I want to avoid.
Is there any method of uploading a video to my blog, directly, without the help of a third party ?
I think it must be a html code for this, too.
Thank you for this excellent post. Very useful.
Have a wonderful day
Nice tutorial. It helps me design my site easily. Thanks for this tip Nile.
Hi Nile,
an easy to follow tutorial.
It is always good to have a few options to do things, so we can use the one that works best for us.
What are you thoughts on this plugin ‘Simple Image Widget by Blazer Six’?
Thank you for sharing your expertise.
Cheers,
Yorinda
Never used it… but I’m willing to take a look at what is out there and may add more to this article to include whatever image widget plugins that work well.
Hi Nile. I enjoyed this tutorial. I put images in my sidebar by putting a text widget and then copy the URL from my media file. I’m not great with HTML, but necessity has forced me to learn more than I ever thought I would. You make things seem so much less complicated. Thanks!
All the best,
Leslie
Nile,
I had seen that method explained once before and I forgot about it. That makes it so easy. Instead, I always have to go back to some other image and see how the html text was written and then add my new image html into that – especially when I want that image to link to a page somewhere else.
Its been a nice help for me Nile as I am a newbie in blogosphere & reading such a nice tutorials for learning these tricks and tips. Thank you for sharing this great tutorial which is of great use for all the newbies over blogosphere.
Very helpful post i was searching this for a long while.
thanks man.
this post really help me thanks Nile
Thank you! I used option 2 to add images to my widget. I used the option with the link to another website for my call to action picture. It works like a charm. Thanks again!
Tiffany C. Wright
The Resourceful CEO